If the answer is yes, then this blog is for you! In this blog, I will teach you everything you need to know about starting and running an eCommerce store with the help of WordPress.
You will learn how to set up your store, choose a theme, design your store pages, add your products, and get it all optimized for search engine visibility.
Along the way, you will also learn some useful plugin tips and tricks that will help you increase your store’s functionality and online sales.
So if e-commerce is one of your passions, then keep reading!
Let’s start an eCommerce Website with WordPress
If you would like to learn through video, wpbeginner made a good video on how to start an e-commerce store with the help of WordPress.
If you would like to read the guide, then just skip it!
Create Online Store [ Learn through Video ]
Setting up WordPress
WordPress is the most popular eCommerce platform on the internet, and for good reason. It’s user-friendly, customizable, and can be set up in minutes – making it a great choice for store owners of all levels of experience. In this guide, we will walk you through the steps of setting up a WordPress store. First, we’ll explain what WordPress is and what it can do.
Next, we’ll show you how to add your core products and start selling. After that, we’ll explain how to configure the settings of your store, and give you a few tips on how to make it look its best. Finally, we’ll provide you with a step-by-step guide on how to launch your store online. Ready to get started? Let’s get started!
Choose and Purchase a Domain Name
To get started with online selling, first, you will need to choose a store theme and domain name. There are countless options available on the WordPress Theme Directory, so it’s important to find something that perfectly suits your business.
Once you have chosen these two pieces of information, it’s time to set up shop! To start off with eCommerce online selling, you will need an account with either Shopify or Magento. After signing up for both platforms and creating an account, add your products and begin shipping orders!
Once everything is set up correctly, register your domain name through a domain name provider such as GoDaddy or NameCheap. Then log in to WordPress and activate it. You’re ready to go – congratulations on starting down the path of becoming an online seller!
Purchase Fast & Secure Hosting
To start hosting a WordPress site, you will first need to purchase a hosting plan from the provider. Once your account is set up and verified, you can then proceed to install WordPress onto it.
Make sure that all of the necessary settings are correct and that your site is online and fully functional before launching it into the public domain!
There are many hosting companies available on the market; it’s important to choose one that best suits your business needs. I am using Racknerd VPS, and it’s pretty good so far.
Choosing a theme for your e-commerce store
Choosing a theme for your eCommerce store can be daunting. There are so many great options available, and it can be hard to decide which one is right for you.
To make things easier, review the features of each theme before making a purchase. Once you have e narrowed it down, begin setting up your shop’s layout and design elements.
Once everything is in place, it’s time to start configuring your store. E-commerce store setup can be a lengthy and time-consuming process, so make sure you have all the necessary resources and guidance to get started.
I recommend Astra theme for you, it’s fast, secure, and best team behind it.
Setting up Your WooCommerce Store
If you’re looking to start an online store, WordPress is a great option. It’s free to use and has a lot of features that make it easy to set up and manage your shop.
Plus, there are many themes available that will fit your online store perfectly. If you’re looking to get more out of your store, WooCommerce is a great plugin to use. It has built-in tools that help you keep track of order processing and shipping updates.
Additionally, WooCommerce has a built-in blog plugin that makes it easy to share your online store’s updates with the world.
So, whether you’re new to online store setup or you’re looking to update and improve your store, this step-by-step guide will help you get started.
Setting up Payments for Your Online Store
Setting up payments for your online store is an essential step in making it successful. By doing this, you will be able to accept payments from customers and ensure that all transactions are properly processed.
Make sure to add all the necessary information – product prices, shipping charges, etc- so that customers can easily make purchases.
Once you have this setup, WooCommerce is a great way to run your business online! It offers a wide range of features that will help you sell products quickly and efficiently. So get started today and watch your business grow!
Adding Products to Your Online Store
Adding new products to your online store is an essential step in promoting and selling them. Once your store is set up, you can add products by following these simple steps:
Here are the steps you need to follow:
1. Add product details, including the product title, description, price etcetera. Make sure all mandatory fields have been filled out.
2. Choose which category your products belong to and then select the product type from the drop-down menu.
3. Click on the ‘Add Product’ button at the top of the page to get started!
Get an optimized design Creating Important Store Pages
Starting an eCommerce store with WordPress can be a daunting task, but not impossible.
To make the process as smooth as possible, follow these simple steps: first, create pages specifically for selling products, registering and ordering products, and blog content; next, use clear and concise language on all store pages;
and lastly, make sure to get a well-optimized design that will help the store rank higher in search engine results. With these tips in mind, starting an e-commerce store with WordPress can be a breeze!
Frequently Asked Questions
How Much Does a WordPress eCommerce Store Cost?
WordPress is the cheapest tech stack to start an e-commerce store. You just need to buy a domain and hosting and use all the free themes and plugins if you are just starting out.
Do I Need to Be a Developer to Create a WordPress eCommerce Store?
No, you don’t need to be a developer to create a WordPress eCommerce store. All you need to do is connect your domain name with the hosting. After that, with the right plugin and some customization, anyone can create an online store in minutes!
Is a WordPress eCommerce Store Secure?
Due to the extremely popular use of WordPress, Hackers are always ready to hack WordPress websites. But with the right software and plugins, you can secure your WordPress website. I just you to use Cloudflare, turn on SSL and use security plugins.
Can a WordPress eCommerce Store Load Fast?
Website speed depends on various factors, but using fast hosting, a good cache plugin, and an Image optimization plugin, you can make any website speed.
Conclusion – It’s time for you to Execute!
After reading this step-by-step guide, you will be ready to start your very own eCommerce store with WordPress.
In this blog, we have outlined everything you need to know to get started, from setting up WordPress to designing your store pages and installing plugins.
Let me know about your store in the comments, and I will do a free website audit ( worth $300 ) and share it with you through the email you use to comment.
Till next blog, BYE BYE!
]]>
Hey, I believe you landed here to learn how to build a sales funnel in WordPress.
Well, your search ends here! (not joking, though )
In this guide, you will understand the importance of sales funnel in your business and how to create a simple sales funnel in WordPress that makes your CRM blow with leads.
Without further ado, let’s dive in!
CartFlows – WordPress Funnel Builder

- High converting templates
- Upsell/Downsell, Orderbumps
- A/B Testing and many more
What is a Sales Funnel?
Sales funnels are used in marketing to help guide prospects through an organized series of steps that lead them to make a purchase. They can be thought of as stages in a journey.
The idea behind it is to get people from where they are now to where you want them to be.
It clears the clutter of your website and focuses only on one goal so that you will get the maximum conversions from the landing page.
Why are you still waiting? Let’s read the whole guide below!
Why do you need a build Sales funnel?
It is important to understand the use of sales funnels in your business before building one. Let’s get through what a sales funnel can do in your business.
1. It can help you increase conversions
2. It reduces customer service costs
3. It increases customer retention
4. It improves your website traffic
5. It allows you to target specific groups of customers (Ideal Customers)
6. It gives you a better understanding of your customers
Why Use WordPress Versus Other Services?
If you are using WordPress for your website or your WooCommerce store, then it’s best to use WordPress for sales funnels. It helps to cut costs of using funnel builders like ClickFunnels.
Everything will be under your control like hosting, security, page builder, etc…
You can work on your favourite page builder inside WordPress which decreases your learning curve to use a new funnel builder.
What you will need to set up a sales funnel in WordPress
1. Fast Web Hosting
You will need fast hosting that helps your sales funnel load faster for your traffic. Use a hosting provider like Digital Ocean that helps you load faster and handles huge traffic too.
2. lightweight and optimized Theme
Using the right theme is very important for any website. It helps your funnels to load faster and increase conversions. At FreeClusters, we use Astra as our theme.
3. Install Important Plugins
Plugins increase the functionalities of your WordPress site. If you want to suggest you install WooCommerce which helps you sell products and install CartFlows, a sales funnel plugin that helps you to build Sales Funnel.
4. A marketing plan with defined goals
Before running any campaign, it is important to have a defined goal so that you know what you are working on and helps you to optimise your sales funnel for it.
Create a Marketing plan on how to bring traffic to your sales funnel, and set up marketing automation and email campaigns to nurture leads that increase sales.
How to build a sales funnel in WordPress (in three steps)
Ah! Here we are on how to build your sales funnel in four easy steps.
Let’s go!
Step 1: Install key plugins and add your products
i. Install Landing Page Builder
To build any page inside WordPress, you will need a landing page builder like Elementor, Divi, Brizy WP, etc..
If you are a beginner, I would suggest you go with Elementor as it’s pretty easy to build landing pages inside it.
ii. Install WooCommerce
If you’re using sales funnels to capture leads, you may not need WooCommece for it.
But if you’re selling anything on your WordPress site, it is always suggested to install WooCommerce as it helps to add products, add your payment gateways to receive money, and many more…
iii. Install Funnel Builder (CartFlows)
It is easy to build sales funnel when you install a funnel builder like CartFlows.
CartFlows is easy to use funnel builder plugin that helps you build sales funnel from ready-made templates, one-click upsells, A/B split testing, and many more.
Step 2: Design your pages
Once, you are done with installing plugins, start designing your landing page, checkout page, and thank you page using your favourite landing page Trbuilder.
You can even use the read-made templates from CartFlows to import and edit the changes.
If you are just building sales funnel to capture leads, you may not need a checkout page.
If you are selling anything, the checkout page is a necessary page in your sales funnel.
Step 3: Send traffic to your sales funnel in WordPress
Congrats, you’ve done the important tasks to build your own sales funnel in WordPress.
Now, you need to send traffic to your sales funnel using Ads, Emails, Social media, etc…
Sales funnel without Traffic is like waiting for rain in a desert!
So, focus on your marketing to send hot traffic and generate sales.
Track and Optimize your Sales Funnel to Increase Conversions
It is important to track the funnel and optimize it to increase conversions.
Here are some basic things to track and optimize your sales funnel.
1. Set Up A/B Testing
A/B split testing helps you to test the landing pages which brings you more conversions so that you can run the high converting sale funnel.
You can use tools like CartFlows to set up A/B testing.
2. Install Google Tag Manager, Google Analytics & Google Optimize
i. Google Tag Manager
If you’re firing many scripts on your website, it affects your page speed.
The best way to counter this is by using Google Tag Manager, it’s free of course.
It helps to increase our page speed by firing the GTM script which itself contains all our scripts. So, instead of firing many scripts, we fire one script that contains many scripts.
You just need to set up Google Tag Manager on your website using plugins like Google Site Kit or pasting the script code into your website code or using the plugin Insert Headers and Footers.
You can implement all scripts inside Google Tag Manager like Facebook pixel, Google Analytics, Google Optimize, Microsoft Clarity, and many more.
Watch this video to set up your Google Tag Manager on your website. It also explains how to add Google Analytics to your Google Tag Manager.
ii. Google Analytics
Ok, We all need to agree that Google Analytics is the best analytics tool for a website.
The best part is, it’s free!
We can set up Google Analytics for your site using plugins like Google Site Kit or Google Tag Manager.
iii. Google Optimize
Google Optimize helps you to test different variants of the web page and see how they perform for an objective you specify.
The best thing I like is you can test your landing page headings, content, button text, color, and many more with having the same URL of the page.
Watch this video to set up Google Optimize using Google Tag Manager.
3. Install Heatmaps & Session recording tools like Microsoft Clarity
Conversion Rate Optimisation is crucial in the sales funnel to increase sales conversions. To understand the traffic behavior on our funnels, we can use heatmaps and session recording tools like Microsoft Clarity, Hotjar, etc…
Hotjar is an excellent tool with a free plan too but I like Microsoft Clarity cause it has most of the features we require and it’s completely free.
You can install Microsoft Clarity on your website using the Microsoft Clarity plugin, Insert Headers and Footer, or by using Google Tag Manager.
For the best practice, I suggest you set up Microsoft Clarity using Google Tag Manager.
How can CartFlows help you build high conversion sales funnels?
CartFlows is one of the best WordPress funnel builders in the market. Adam Preiser from WPCrafter is one of the co-founders of CartFlows.
It has high-converting templates to use right from the first day. You can easily implement one-click Upsell/ Downsells, Order bumps, A/B testing, pre-checkout offers, and many more.
Canvas mode makes it easy to visualize the complex funnels you build.
You can use modern checkout to do real-time email validation, autofill address fields, etc…
It shows in-depth analytics of your funnel from visits to conversions, revenue etc…
If you want to build a funnel on WordPress, then It’s worth trying CartFlows as your funnel builder.
How to build a sales funnel in WordPress using CartFlows?
I don’t buff but let me show you how to build a simple funnel in 4 steps using CartFlows.
Step 1: Of course, you need to install the CartFlows plugin and activate it.
Step 2: Run the setup Wizard and choose your preferences such as page builder, checkout page, etc…
Step 3: Go to CartFlows and click on Flows to start creating your funnels. You can import templates or create them from scratch.
Step 4: Add the pages you need such as Optin, Checkout, Upsell/Downsell, and Thank you, design them and add your products.
Woohoo! You’ve created a sales funnel in WordPress using CartFlows.
Conclusion – Let’s Build Sales Funnel on WordPress
The guide came to an end!
You’ve learned about the sales funnel and its importance in your business.
I explained the requirements of a sales funnel and how to build, track, and optimize it using various tools.
In this guide, we used CartFlows to build funnels and I hope you’ll try this amazing tool.
I may have to bye to you for today but I hope you will remember this guide while building your first sales funnel.
Did this guide help you in understanding “How to build a sales funnel in WordPress?”.
If yes let me know in the comments or if it didn’t tell me where you got stuck in the guide, I will reply to your comments and update the guide to help solve your doubts.
See you soon 

Want to build fast and beautiful websites in minutes?
Then, You need to try your hands on Brizy Cloud.
Brizy Cloud is one of the best online website and landing page builders with beautiful pre-built templates, even in dark mode too.
Without any further ado, let’s dive into the brizy cloud review.

Try Brizy Cloud for Free
Brizy Review
Brizy is founded in 2018. It has 8 employees according to LinkedIn.
Brizy has two products.
- Brizy WordPress plugin (No hosting)
- Brizy Cloud – Landing pages & Online Website Builder with Hosting
Let’s get into the Brizy Cloud review!
Brizy Cloud Review
What is Brizy Cloud?
Brizy Cloud is a landing page builder with hosting developed by the Brizy team. You can build websites, memberships, Blogs, etc.. on it without worrying about hosting.
With the help of brizy cloud, you can create landing pages, multi-page websites, popups, and stories (similar to Instagram stories)
Let’s dive into landing pages first!
Brizy Cloud Features
Brizy Cloud Hosting – Build Landing Pages/Websites in minutes!
This is the feature that is used most and deciding factor to buy it or not.
Click create a new project and select landing pages/websites.
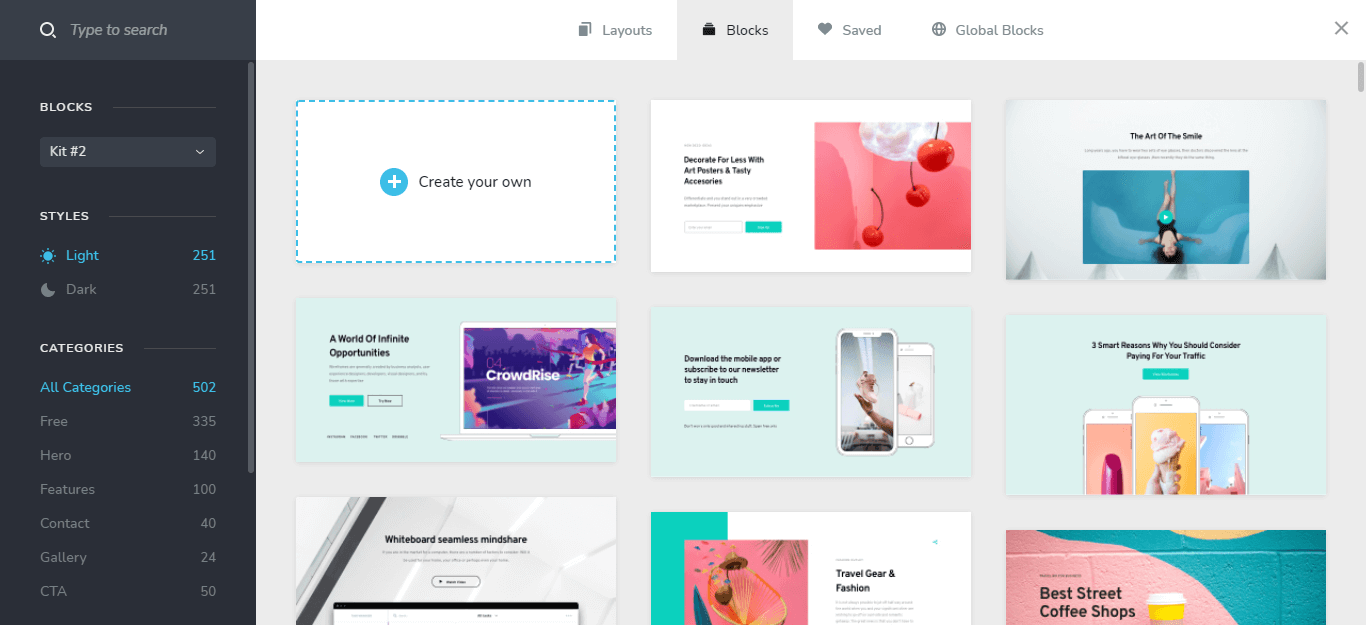
Click on start building your page, you can create from scratch or there are 108 layouts for the full site (homepage, contact, about, etc..)
Or select blocks to import each section, there are two block kits each one having more than 150 blocks to select from. I liked the Dark style blocks.
You can easily find the blocks you need by selecting the categories on the left side.
Page Builder – Imp feature to help us build sites Faster 

The brizy cloud builder is smooth and easy to edit, with a very little learning curve for elementor users (like me )
)
Click the “+” icon at the top left to add elements by drag and drop and drop, you can also add “embed element” and paste your code there.
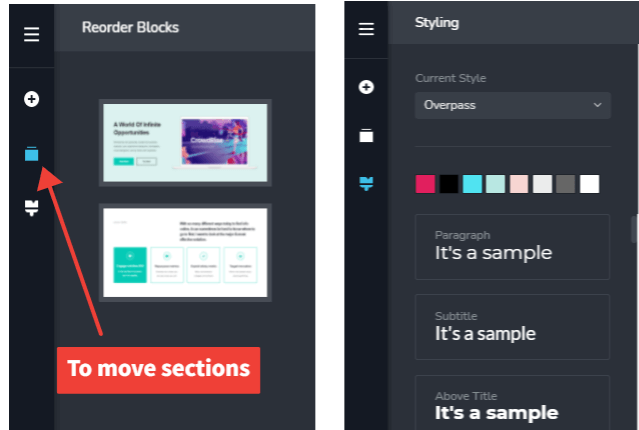
Select the reorder blocks to move blocks by dragging and setting colors and typography in styling.
You can view the page in desktop, mobile, and tablet versions by clicking on the desktop icon at the bottom left.
Overall, Brizy Cloud builder seems easy to use and build sites, but I got stuck searching for some features as I am an Elementor user  .
.
Content Management System (CMS) – WordPress Alternative?
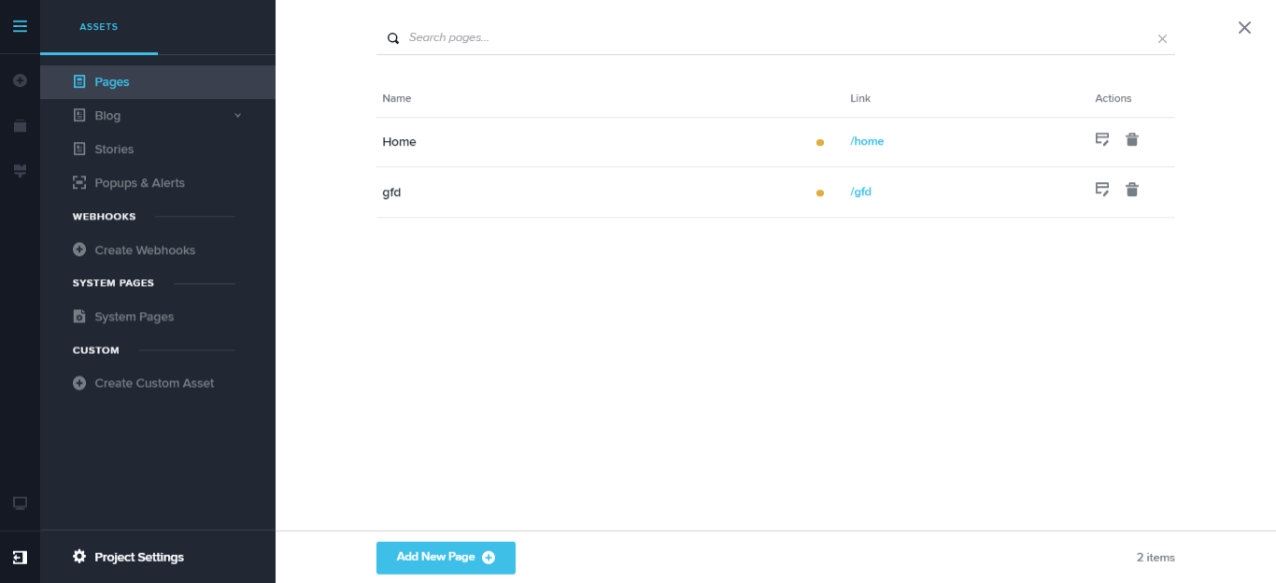
Click on the top icon at the left top to go to Brizy Cloud CMS.
In CMS:
- you can create multiple pages for a website
- you can create a blog with posts and categories
- you can create stories and popups for that site (you can create them individually too)
- you can create webhooks
- you can create system pages like Coming Soon, Maintainance, 404 error pages, and password-protected pages.
- you can create advanced custom fields & assets to make the blog dynamic.
With Brizy Cloud CMS, you can build multi-page sites and build blogs with the help of advanced custom fields & assets.
System pages are good, you can use the coming soon page for your new site and the maintenance page if you are doing any major updates on it. You can build popups inside the site.
Overall, It is good to use if you don’t want to pay for hosting for a blog, but still, I would recommend WordPress CMS for a blog. I think it is good to build landing pages and websites for clients.
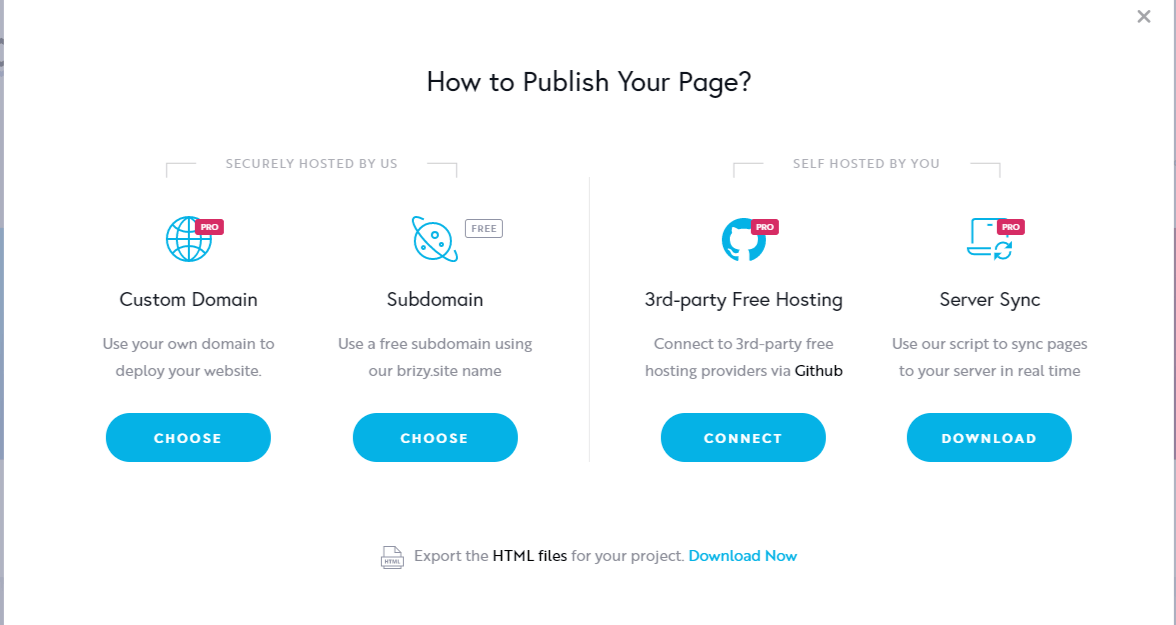
In Brizy Cloud, you can publish your pages on a custom domain or a subdomain using brizy.site domain name or you can export the HTML files and import them to your hosting provider.
You can also self-host your pages using 3rd-party free hosting providers via Gituhb and sync servers in real-time.
Brizy Cloud Popup builder – Get 10x Conversions with popups
Popups increase the conversions, even though some may feel annoying seeing them.
You can create popups inside the brizy cloud and use them on external websites by embedding the code there.
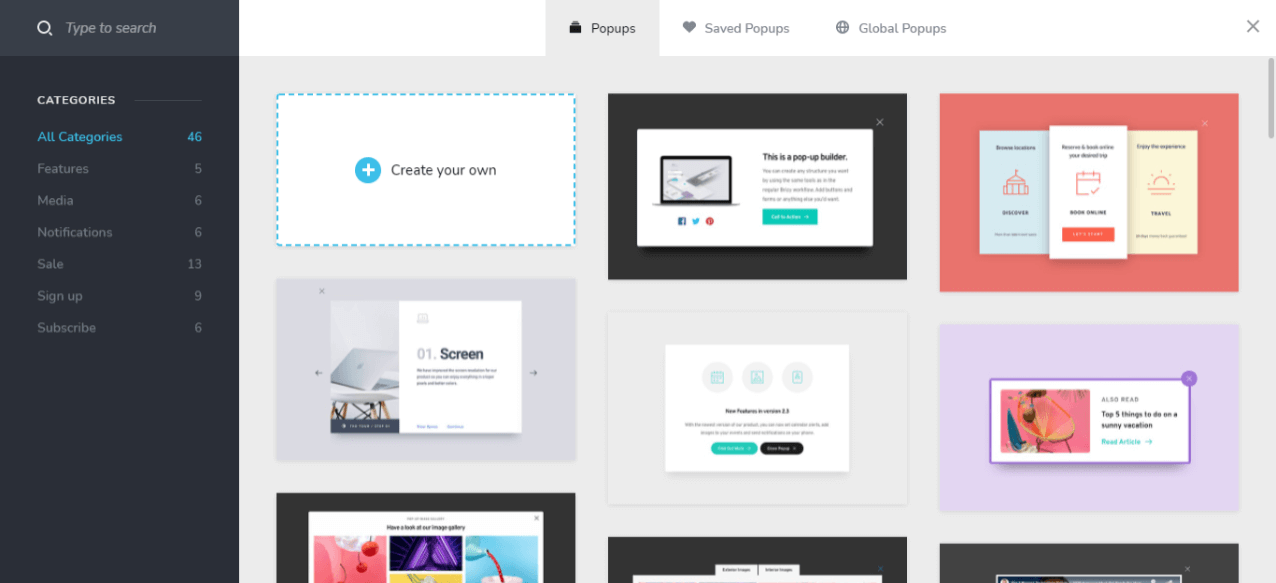
Create a new project and select a popup. you can select any pre-built templates or you can build them from scratch.
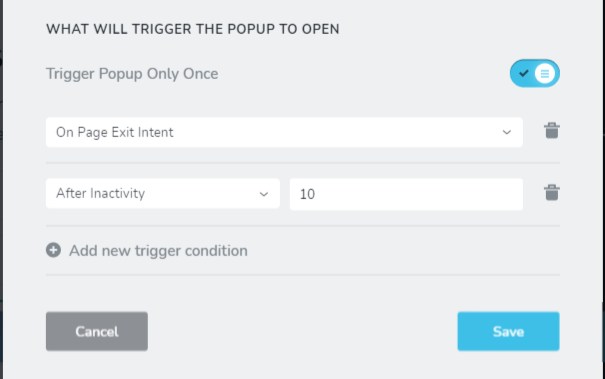
You can even trigger the popup on when to open it and display it to the users.
You have many triggers to set the popup. With Exit-intent, you can trigger when the user’s cursor closes or moves to another tab. It will definitely increase conversions.
You can hit publish and copy the embed code and paste it into the footer of our site.
I tried it on one of my sites and it worked well on it.
Stories – Mobile Optimized Pages
Stories are mini landing pages optimized for mobile users and work the same as Instagram stories.
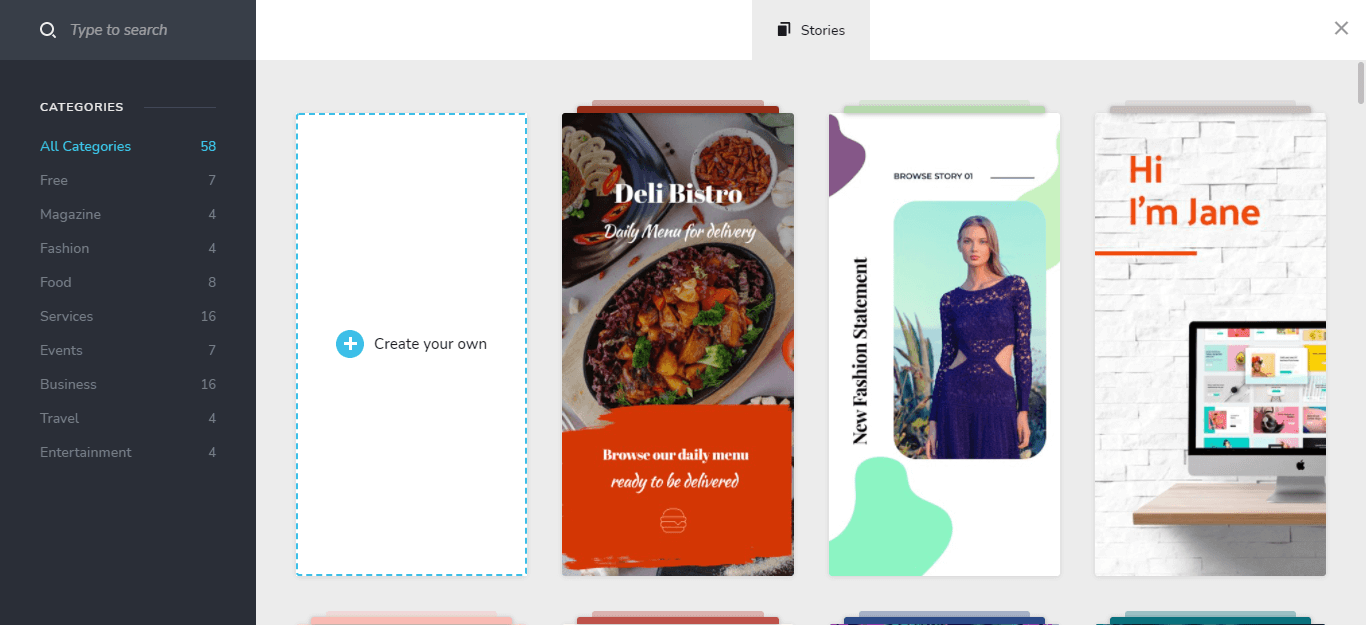
It has some cool templates to choose from.
You can test these stories if you run any campaigns for mobile users. I have many got good conversions using mobile pages. But, the drag and drop element is not working correctly.
If I try to add any element to the story, it gets inserted in the middle of the page but I am not able to drag and drop it at any point, and the next element I add is also get inserted in the middle of the page.
Brizy Cloud Free Plan
It is free to build Unlimited landing pages and websites on brizy cloud. Try it before you purchase  .
.
SEO – Want to Rank #1 on Google?
In Brizy Cloud, all you can do is simple SEO like SEO Title and SEO Description.
You can add Alt Tags for your images in brizy cloud.
You can’t do Advanced SEO stuff that you do with the help of SEO plugins in WordPress.
Good to go with landing pages and funnels  .
.
Speed – Make your site load below 2 Sec?
Everyone loves speed even google does, and it is one of the deciding factors to buy any landing page builder too.
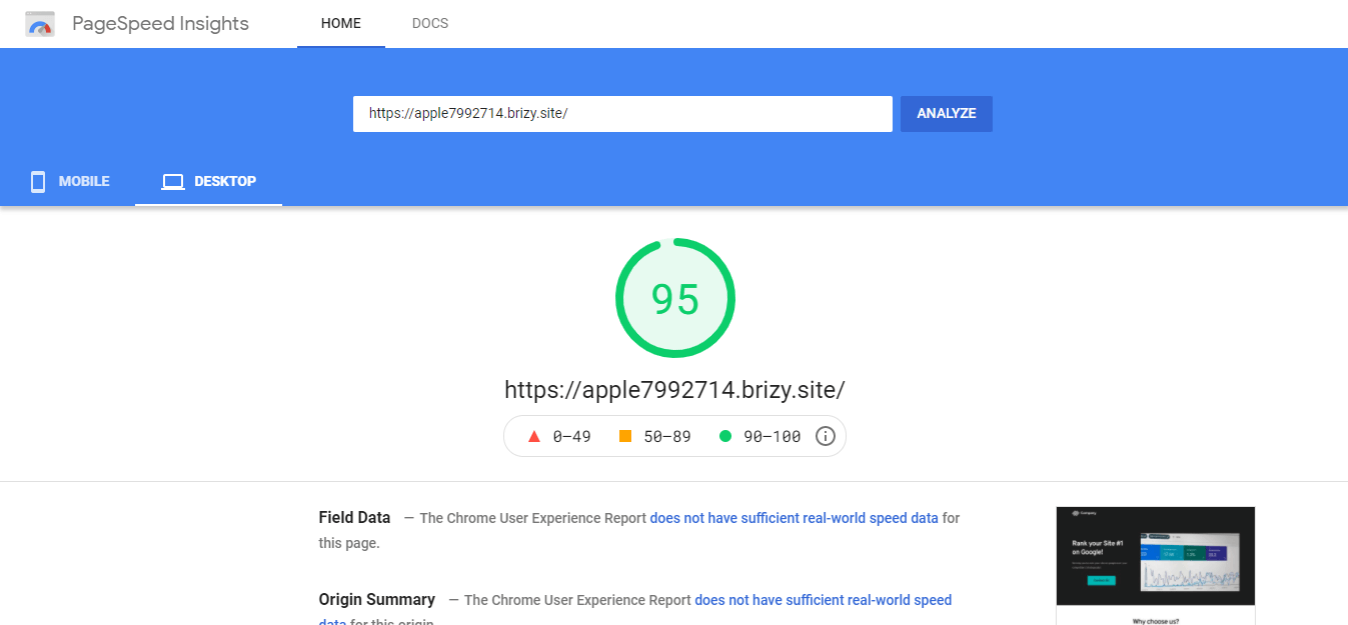
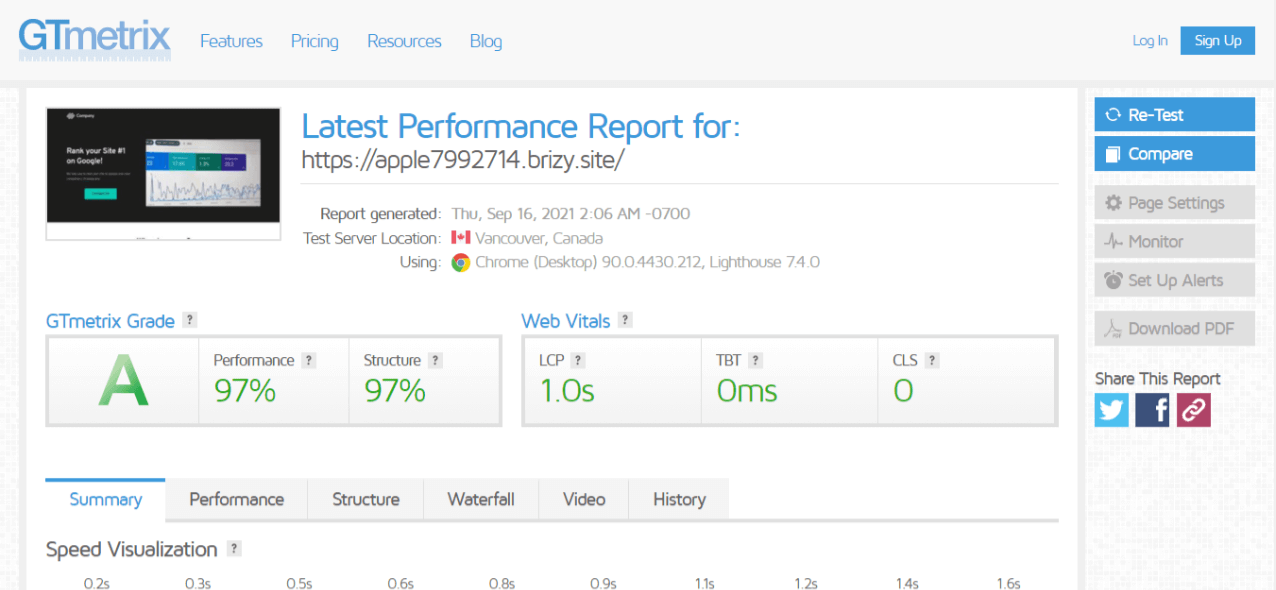
I created a demo site on brizy cloud and here are the speed scores by google page insights and GTmetrix.
I heard that the speed sucks in brizy cloud, but I saw it has a good speed for the sites I have built.
You can see the below screenshots too.
Google page speed Insights score:
GTmetrix Score:
Brizy Cloud Integrations
Currently, Brizy Cloud has integrations with most of the big email marketing softwares such as Mailchimp, Sendinblue, Convertkit, mailerlite, Activecampaign, etc…
You can also connect to Zapier and integrate with 3000+ softwares easily.
But, I think they need to have Pabbly, Integromat, and Integrately Integrations to save some money on zapier.
Collaboration Tool – Make Changes faster with Clients & Team members
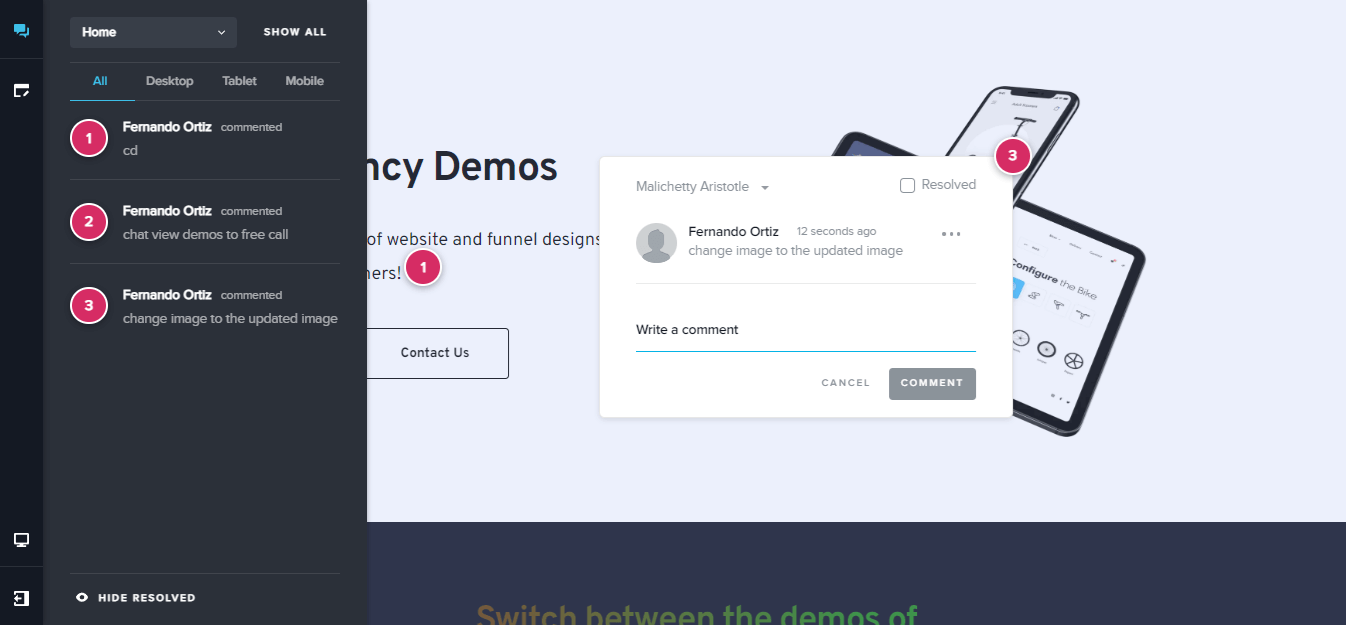
You can collaborate with clients and your team for making changes to your landing pages in desktop, mobile, and tablet views.
It is an excellent feature if you are working with your clients.
You clients can mark the changes that need to be done and you can do it and check resolved option.
You can assign the task to a specific person too.
What’s Coming Soon on Brizy Cloud?
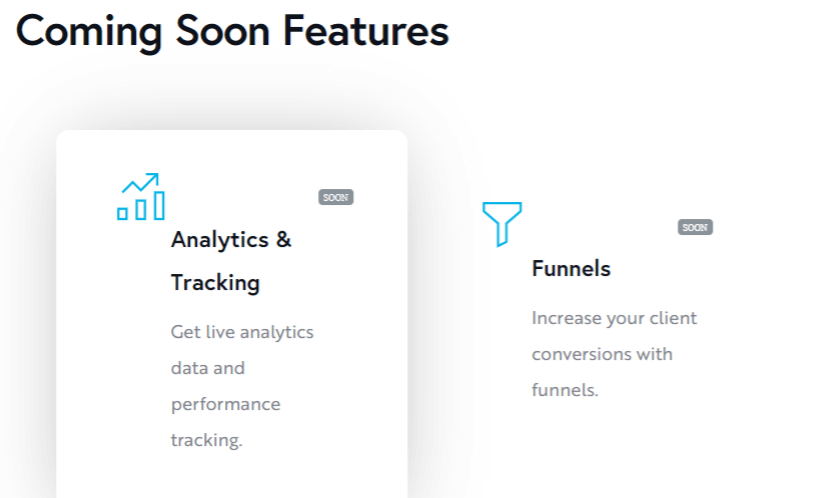
Analytics & Tracking – you can view the page visits, and conversions to track the performance of the campaign without the need of inserting any Google Analytics code.
Funnels – Without linking the pages one to another, you can use funnels, and do it in a more efficient way. This is a good feature to be expected.
You can see all upcoming features in the roadmap of Brizy Cloud.
Brizy Cloud pricing
There are four pricing plans of brizy cloud for a subscription.
1. FREE Forever Plan – $0/year
You can build Unlimited websites with a brizy domain. It comes with basic design & functionalities and limited hosting.
2. Personal – $55/year
You can publish one custom domain and Unlimited websites with a brizy domain. You can have 1 workspace. Your sites have Unlimited traffic with basic CDN & SSL.
3. Freelancer – $209/year
You can publish 20 custom domains and Unlimited websites with a brizy domain. You can have 20 workspaces. Your sites have Unlimited traffic with basic CDN & SSL added with Membership functionality.
4. Agency – $349/year
You can publish 100 custom domains and Unlimited websites with a brizy domain. You can have 100 workspaces. Your sites have Unlimited traffic with basic CDN & SSL added with Membership functionality and brizy cloud Whitelabel.
Check the lifetime deal below, if you don’t want to pay a monthly subscription.
*All plans come with a 30-day money-back guarantee
Brizy Cloud Lifetime deal

At present, brizy cloud is running a lifetime deal. It has 3 plans
Personal Cloud – $199 for 1 site
Freelancer Cloud – $749 for 20 sites
Agency Cloud – $1499 for 100 sites
It is now ended but you can join our Facebook group and ask if anyone is selling their account.
Brizy Cloud Review FAQs
Is Brizy Pro worth it?
Definitely, it is. You can host on Brizy cloud without any security and hosting issues. It helps to build sites without getting into trouble with WordPress hosting, themes, and plugins conflicts that need to be updated every time.
Is Brizy Cloud good?
Yes, brizy cloud is one of the popular landing page builders. You can build beautiful websites and dynamic content with powerful features.
Is Brizy Cloud Free?
Yes, Brizy cloud is completely free to try their builder with a Free Forever plan.
Brizy Cloud Use-Cases
- You can build landing pages or funnels for yourself or your clients.
- you can build websites for your clients and get rid of hosting costs.
- you can build popups to show on sites built on brizy cloud or external sites and collect leads.
Brizy Cloud Review Conclusion – Buy It or Skip It!
We have seen all the features and use-cases of brizy cloud.
Brizy Cloud is a mature platform to build websites and landing pages. I like their page builder which makes it easy to build landing pages and their collaboration tool makes the process fast.
I believe it is a good investment for the features it provides.
It is good to buy if
- you build landing pages, and websites for yourself.
- You want to build landing pages, websites, and funnels for your clients.
- you are an agency.
So, the decision is on you 
Let me know which is your favourite page builder in the comments.
Share this review with your friends & colleagues, if you find this post useful!
]]>